Table of Contents
Tait TM8XXX - Firmware upgrades
Read and understand all the notes before attempting a firmware upgrade. Failure to do so may make your radio inoperable.
Upgrading the firmware on both the TM8100 and TM8200 series radios is almost identical.
As a general rule I don't think there's a huge need to change the firmware, however there's a couple of scenarios where it might help:
- I had a radio with an ancient firmware version that insisted on having a scanning group configured, and appeared to be permanently stuck in scanning. I couldn't find a workaround so I upgraded the firmware to make it behave the same as my other Tait radios.
- Newer firmware versions may limit channel width to 12.5kHz. Reverting to an older firmware without the restriction fixes it.
Series Specific Notes
TM8100
- The recommended firmware version is 2.18. Newer versions limit channels to 12.5kHz. The .s2 file should have a md5sum of
5dd5207da78f2b37e35d2169c7a7141d
TM8200
- The recommended firmware version is 6.01.00. Newer versions limit channels to 12.5kHz. TODO: Checksum
- Radio body “Radio Application” files are prefixed with QMA, for the control head its QCA.
- From the manual: “TM8200 bodies and High-Tier heads must both have matching Firmware versions in order to operate correctly when assembled” If they don't, the screen will display “Firmware mismatch” or words to that affect. If you try to upgrade the firmware whilst in this state the programming software will time out. The trick is power off the radio (fully, not via the control head) kick off the firmware download process and then power up the radio. This might take a couple of goes, but the radio should then start to upgrade the firmware
Preliminaries
If the firmware flashing is interrupted for any reason you might end up with a bricked radio. The Tait's are fairly robust so it may be possible to recover them, but fortunately as of yet I've not had to do it.
To minimise the likelihood of a bad flash I try to avoid any potential interference to the serial communications by ensuring no radios near by are transmitting, including mobile phones etc. You may also want to minimise the likelihood of a power outage. This could include running the radio off a battery and using a fully charged laptop. So far I've just crossed my fingers and got on with it, but you never know.
The recommended Calibration Application is version 4.09.00
TODO: Include respective latest Programming Applications
Save the current programming
- Connect the programming cable to your radio and computer
- Open the Programming Application
- Navigate to Tools > Options and confirm the Communications Port is set correctly
- Read from the radio by pressing Ctrl + R, or going to the Radio menu and clicking read. This will take a moment.
- Hit the disk icon in the menu bar to save the file to disk. It might be prudent to back it up somewhere like cloud storage.
- Close the Programming Application
Save the current calibration data
Note this software will only work on COM port 1-4. If your programming cable isn't in this range, change it in Windows Device Manager.
- Open the TM8000 Calibration Application
- Navigate to Tools > Options and confirm the Communications Port is set correctly
- Read from the radio by pressing Ctrl + R, or going to the Radio menu and clicking read. This will take a moment.
- Do not adjust any of the settings!
- Hit the disk icon in the menu bar to save the file to disk. You might want to name it to differentiate between different radios although by default it'll include the serial number. You don't want to lose this file, so make a back up somewhere like cloud storage.
- Close the Calibration Application
Upgrade the firmware
Note: Make sure you've backed up the calibration data!
- Open the Programming Application
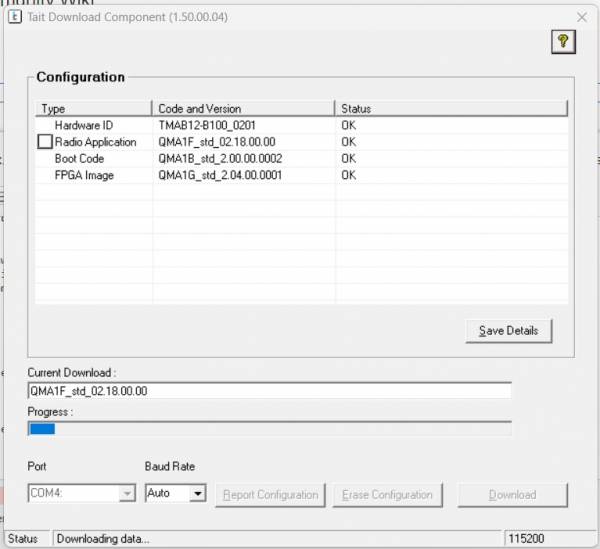
- Go to Tools > Download to open the Firmware Download Application in a new window. It might take a while.
- In the new window, select the COM Port in the bottom left corner.
- Click “Download”, it'll then open a prompt for you to select the file.
- Once selected, the radio will reboot and the firmware upgrade will begin.
- Once completed you'll see “Download Successful” in the bottom status bar and the radio will reboot.
- Close the Download Application
Restore the programming
- Go back to the Programming Application
- Press Ctrl + O or go to File > Open and open the programming file you previously saved
- Write it to the radio by pressing Ctrl +M or go to Radio > Program
- Wait for the programming to finish being written to the radio.
- Close the Programming Application
Restore calibration data
- Open the TM8000 Calibration Application
- Navigate to Tools > Options and confirm the Communications Port is set correctly
- Press Ctrl + O or go to File > Open and open the calibration file you previously saved
- Write it to the radio by pressing Ctrl +M or go to Radio > Program
- Wait for the calibration data to finish being written to the radio.
- Close the Calibration Application
Your radio should be upgraded

