This is an old revision of the document!
Table of Contents
Motorola GM1280
The Motorola GM1280 support trunking, but also has a “conventional” mode which makes it useful for packet radio. It has been found to work with the 9600 baud GFSK mode which is great for a fast packet link.
Power
The radio nominally uses 13.2V, but works happily at 12V too. The power connector on the rear is SAE, commonly used in the automotive industry.
Physical Connection to TNC
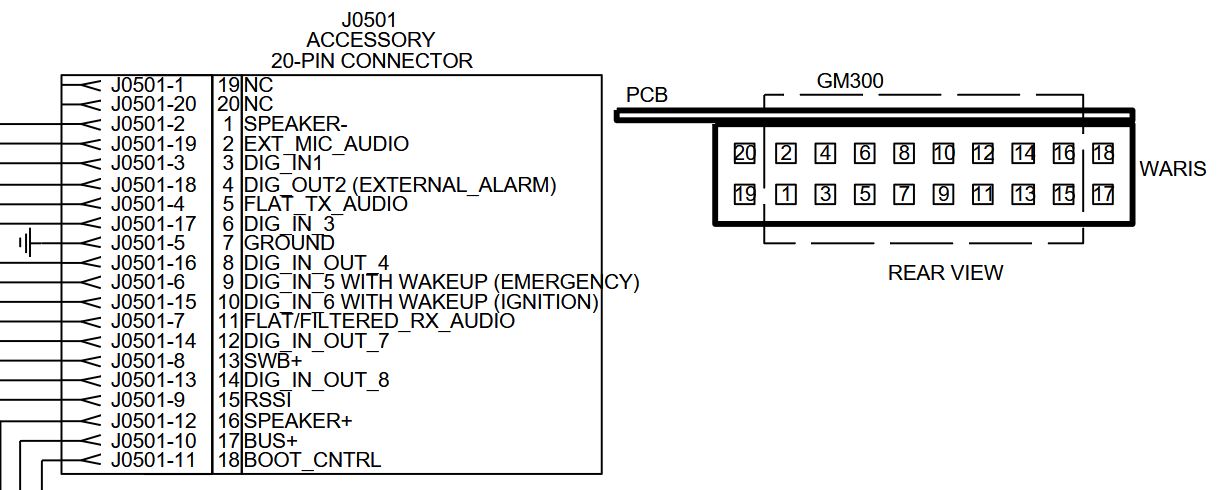
On the back is a 20-pin accessory connector which provides pins for flat audio receive and transmit, data PTT, and ground.
A strip of standard PCB female headers fit perfectly into one row of the 20-pin socket if you do not have an appropriate plug.
NinoTNC connection
| 20-Pin Accessory | NinoTNC pin |
| 5 FLAT_TX_AUDIO | 1 |
| 3 DIG_IN1 (DATA PTT) | 3 |
| 11 FLAT_RX_AUDIO | 5 |
| 7 GROUND | 6 |
For this pinout to work, you must program the radio correctly as per the next section.
Programming for Packet Use
You will need to obtain the “Motorola CPS for MPT Professional Radios” software for programming (Windows only). The exact version required may depend on the model/version of the radio, but version R00.08.08 was found to work for a UHF radio whose label listed “Type: MW504AD”.
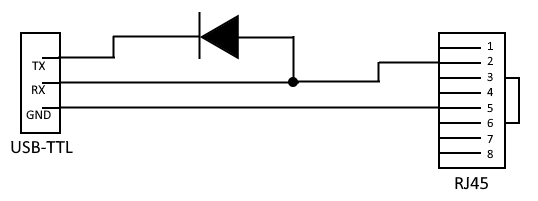
A programming cable can be built from a USB-TTL adapter (5v worked for me), RJ45 plug, and a diode (almost any diode will do it seems). The RX and TX from the TTL adapter are connected to a single pin on the RJ45 via this diode, as in the diagram below.
Insert the RJ43 to the mic port, and connect the USB-TTL to the computer, noting the COM port that it is assigned in Device Manager. In the CPS software, Go the the Options menu, select Configure, select the COM port and click OK. Power on the radio by pushing the centre of the volume knob for a couple of seconds. You can now test the connection tot he radio by going to the File menu and selecting Read Radio.


