Table of Contents
Raspberry Pi
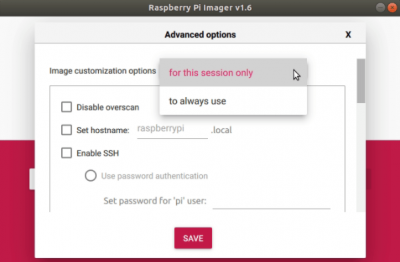
Raspberry Pi Advanced Hidden Menu
https://www.tomshardware.com/news/raspberry-pi-imager-now-comes-with-advanced-options
press CTRL + SHIFT + X
I found that this only works if you have on-board WiFi
Defaults
Default user: pi
Default password: raspberry
Change password
sudo passwd pi
Enable SSH
sudo raspi-config
Interface Options –> P2 SSH
Configure WiFi
sudo raspi-config
(problems with drivers in USB dongles are common)
The error:
nl80211: Driver does not support authentication/association or connect commands
means that the standard nl80211 doesn't support your device , you should use the old driver wext.
To correctly set up your wpa_supplicant.conf , it is better to use the wpa_passphrase command:
wpa_passphrase YOUR-SSID YOUR-PASSWORD >> /etc/wpa_supplicant/wpa_supplicant.conf
run:
wpa_supplicant -iwlan0 -D wext -c/etc/wpa_supplicant/wpa_supplicant.conf -B
dhclient wlan0
To automatically connect to your AP after restart edit the wlan0 interface on your /etc/network/interfaces as follow:
allow-hotplug wlan0
iface wlan0 inet dhcp
    wpa-conf /etc/wpa_supplicant/wpa_supplicant.conf
Set Static IP
sudo nano /etc/dhcpcd.conf
# Example static IP configuration:
interface wlan0
static ip_address=192.168.0.30/24
#static ip6_address=fd51:42f8:caae:d92e::ff/64
static routers=192.168.0.1
static domain_name_servers=192.168.0.1 8.8.8.8 fd51:42f8:caae:d92e::1
Update apt
apt-get update
apt-get upgrade
Get Dire Wolf
Guide by 2E0SIP
Update Dependencies
apt-get install git build-essential libasound2-dev libudev-dev alsa-utils rsyslog logrotate gpsd libgps-dev
Get Dire Wolf Source Code and build it
cd /usr/src
git clone http://github.com/wb2osz/direwolf
cd direwolf
make
make install
From Direwolf documentation
The build procedure has changed in version 1.6. In general, it now looks like this:
Download the source code:
      cd ~
      git clone https://www.github.com/wb2osz/direwolf
      cd direwolf
Optional - Do this to get the latest development version rather than the latest stable release.
git checkout dev
Build it. There are two new steps not used for earlier releases.
      mkdir build && cd build
      cmake ..
      make -j4
Install:
      sudo make install
      make install-conf
You will probably need to install additional applications and libraries depending on your operating system. More details are in the README.md file.
Questions?
- Extensive documentation can be found in the 'doc' directory. - Join the discussion forum here: https://groups.io/g/direwolf
Add Dire Wolf Config for an IGate
Place Dire wolf config in
/etc/direwolf.conf
#
# Sample configuration for SDR read-only IGate.
#

# We might not have an audio output device so set to null.
# We will override the input half on the command line.
ADEVICE null null
CHANNEL 0
MYCALL CALLSIGN

# First you need to specify the name of a Tier 2 server.
# The current preferred way is to use one of these regional rotate addresses:

#       noam.aprs2.net          - for North America
#       soam.aprs2.net          - for South America
#       euro.aprs2.net          - for Europe and Africa
#       asia.aprs2.net          - for Asia
#       aunz.aprs2.net          - for Oceania

IGSERVER euro.aprs2.net

# You also need to specify your login name and passcode.
# Contact the author if you can't figure out how to generate the passcode.

IGLOGIN CALLSIGN PASSWORD

# iGate information

PBEACON sendto=IG delay=0:30 every=10:00 symbol="igate" overlay=R lat=xx^xx.xxN long=xx^xx.xxW comment="144.800MHz IGate, rPi 1, RTL-SDR,
Dire Wolf"

# Logging

LOGDIR /var/log/direwolf/

# That's all you need for a receive only IGate which relays
# messages from the local radio channel to the global servers.
Get APRS passcode
Create the direwolf user
adduser --system --no-create-home --group direwolf
Add direwolf user to the audio group
Maybe a good time to install RTL-SDR
sudo apt-get update
sudo apt-get install cmake build-essential libusb-1.0-0-dev
cd /usr/src
git clone git://git.osmocom.org/rtl-sdr.git
cd rtl-sdr
mkdir build
cd build
cmake ../ -DINSTALL_UDEV_RULES=ON -DDETACH_KERNEL_DRIVER=ON
make
sudo make install
sudo ldconfig
Run test
rtl_test
Starting Direwolf on boot
Next we need to create a systemd service so direwolf starts on boot. We also redirect stdout and stderr to syslog, so we can treat it as a log file.
Add direwolf to the plugdev group
sudo usermod -a -G plugdev direwolf
Create direwolf.service file
nano /lib/systemd/system/direwolf.service
With following content
[Unit]
Description=Direwolf Daemon
Wants=network-online.target
After=sound.target syslog.target network-online.target

[Service]
User=direwolf
ExecStart=/bin/sh -c 'rtl_fm -f 144.8M - | direwolf -c /etc/direwolf.conf -r 24000 -D 1 -'
StandardOutput=syslog
StandardError=syslog
SyslogIdentifier=direwolf

[Install]
WantedBy=multi-user.target
Symlink the service
ln -s /lib/systemd/system/direwolf.service /etc/systemd/system/direwolf.service
Reload systemctl
systemctl daemon-reload
Enable the direwolf service
systemctl enable direwolf
Also enable the systemd-networkd-wait-online service so Direwolf starts after the network is up
systemctl enable systemd-networkd-wait-online
Configure Logging
Earlier we configured the direwolf systemd service file to redirect all stdout and stderr to syslog. So it's easier to read we need to redirect the log entries to their own file.
Create the directory for the log files
mkdir /var/log/direwolf
Set the permissions to the correct user
chown -R direwolf:direwolf /var/log/direwolf/
Create a .conf file for rsyslog
nano /etc/rsyslog.d/direwolf.conf
And enter the following
if $programname == 'direwolf' then /var/log/direwolf/direwolf.log
& stop
Then create a logrotate configuration file
nano /etc/logrotate.d/direwolf
And enter the following. Feel free to edit the parameters to suit your needs
/var/log/direwolf/aprs.log
{
    rotate 5
    daily
    missingok
}

/var/log/direwolf/direwolf.log
{
    rotate 5
    daily
    missingok
    postrotate
        invoke-rc.d rsyslog rotate > /dev/null
    endscript
}
Steps to remember after ISO write
1. Change callsign and APRS pass
5. Remove bash history


