Table of Contents
BPQ Nodes on APRS
This guide explains how to configure BPQ nodes to interact with APRS (Automatic Packet Reporting System) using APRSDIGI. We'll cover formatting APRS data, configuring IDMSG and beacons, and setting up APRSDIGI for listening and forwarding data to the APRS network.
Formatting APRS Data
To ensure compatibility with the APRS network, follow this format for location information in your IDMSG:
!5505.10N/00136.44WBGB7CNR OARC PRN (https://packet.oarc.uk). AX.25 1200bd @ 144.9375
||       ||        ||     |
||       ||        ||     |_________________________Comment_________________________
||       ||        ||_Node
||       ||        |_Symbol (2nd part from the Primary Symbol Table)
||       ||_Longitude (DDDmm.mmW/E)
||       |_Symbol (1st part from the Primary Symbol Table)
||_Latitude (DDmm.mmN/S)
|_APRS indicator "!"
APRS lat/lon format is bizarre. See this to avoid having to work it out for yourself.
For additional status information, prefix a “>” to your beacon line. This will display as a status packet in purple on most APRS network tools.
Thanks to Robin (M0JQQ) for the above diagram
Configuring IDMSG and Beacons
1. IDMSG Configuration: Update your bpq32.cfg file with the following IDMSG entry:
IDINTERVAL=15 ; (minutes) or whatever value you wish to use
IDMSG:
!5505.10N/00136.44W#GB7CNR OARC PRN (https://packet.oarc.uk/). AX.25 1200bd @ 144.9375
***
This entry ensures regular updates to the APRS network.
2. Beacon Configuration: Navigate to PORTS > [Port of Choice] > BEACON to set up additional information to be sent to the APRS network.
Configuring APRSDIGI
APRSDIGI is configured to listen and forward data to the APRS network without transmitting back. NOTE! if you configure APRSDIGI on your node. you do not need to alter your IDMSG or BEACON.
APRSDIGI
; Local station data for APRS-IS
APRSCall=GB7DLV ; Node callsign
StatusMsg=OARC PRN (https://packet.oarc.uk)
Symbol=B
Symset=/

; Specify position
LAT=5450.84N
LON=00149.30W

; IGATE Params
ISHost=euro.aprs2.net
ISPort=14580
ISPasscode=[APRS-IS PASSCODE] ; https://apps.magicbug.co.uk/passcode/

; Object with additional information
OBJECT PATH=IS PORT=1,IS INTERVAL=30 TEXT=>PORT1: 144.9375Mhz ax.25 1200bd PORT3: TELNET

; Specify Dest Address and Path
APRSPath 1=

BeaconInterval=5
MobileBeaconInterval=2

; Define Crossport Digi
; If you are listening to more than one port. add lines Digimap n=IS (n matches the port number you wish to listen to)
Digimap 1=IS

; Define Digipeating parameters
TraceCalls=WIDE,TRACE
DigiCalls=[callsign] ; node or your callsign here

ReplaceDigiCalls
MaxTraceHops=2
MaxFloodHops=2

ISFilter=m/0
Receive-only setup
Do something like this to achieve a receive-only igate setup (e.g. if you are listening for telemetry beacons from remotely located kit, and you want to gate it to APRS-IS / aprs.fi)
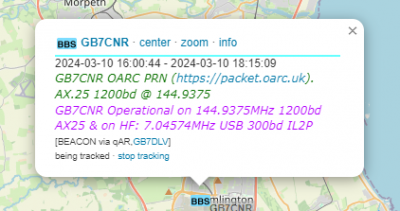
This will also put a BBS pin in the https://aprs.fi map for your own node, via the internet. Like this.
Put this new block outside the PORTS section of the config file, i.e. at the root level.
APRSDIGI
  LAT=5026.83N    ; calculating these is non-obvious, use this website to help
  LON=00101.62W   ; https://om1amj.sk/index.php/conversion-of-gps-coordinates-to-aprs-format
  StatusMsg=Put a message here, maybe a link to your node page at https://ukpacketradio.network
  Symbol=B
  Symset=/        ; B/ is BBS icon
  APRSPath 1=     ; I have three ports, 1-3, may as well listen on all of them for APRS
  APRSPath 2=     ; These are all receive-only ports for APRS.
  APRSPath 3=
  ISHost=england.aprs2.net
  ISPort=14580
  ISPasscode=nnnnn     ; calculate this value here: https://apps.magicbug.co.uk/passcode/index.php/passcode
  OBJECT PATH=IS PORT=1,IS INTERVAL=30 TEXT=>Any text you want goes here
  BeaconInterval=30    ; minutes
***
Substitute appropriate values for yourself.
Don't forget the *** at the end, it's crucial

