
Table of Contents
QtTermTCP
Official Website: https://www.cantab.net/users/john.wiseman/Documents/QtTermTCP.html
QtTermTCP is a software package created by John G8BPQ that acts as a “terminal” for interacting with packet radio stations. It can connect to directly to a BPQ node using FBB over IP, or the more recent beta version supports KISS, both with a directly connected serial TNC or over TCP to something like Dire Wolf.
The following Wiki page covers getting started with QtTermTCP. It assumes you've got a working Radio + TNC setup.
Installation
Windows
The instructions were tested on Windows 11 but presumably works on other versions.
First off if it doesn't already exist, create a directory in your Documents directory and call it something like “Packet Radio Software” or similar.
Download QtTermTCP.zip
Extract it, and copy the “release” directory to the newly created directory, then rename it to something useful like QtTermTCP.
To access if from the Start Menu, Find QTTermTCP.exe, Right Click it, and select Pin To Start.
Optionally if you want to create a desktop shortcut, you can also Right click the exe again, select Show more options > Send to > Desktop (Create Shortcut)
This completes the installation.
Debian-ish operating systems
If you have a Debian-like OS, such as Ubuntu, Raspberry Pi OS, or indeed Debian itself, please consider using the repository here: https://github.com/Online-Amateur-Radio-Club-M0OUK/oarc-packages - instead of following the manual installation steps below.
MacOS Download
Download QTTermTCP.app (version 0.0.0.77)
MacOS with Brew
If you use MacOs with the Brew Package Manager a tap has been set up that will compile the QtTermTCP binary from source including dependencies:
brew install tomwardill/oarc-qttermtcp-tap/oarc-qttermtcp
QtTermTCP
This installs the QtTermTCP app as if it was a CLI app, so it must be started from the terminal.
Ubuntu 22.04 - standard installation
In almost every case, you are better off installing by following this guide than building it yourself: https://guide.hibbian.org/clients/qtttcp/
Ubuntu 22.04 - manual installation
Tom M0LTE has kindly setup some Github actions for building QTTermTCP for 64 bit Linux. The subsequent compiled binary can be found here
First of all open a terminal, change to root, and install the dependencies:
su root
apt-get update
apt-get install libqt5serialport5 libqt5widgets5

Next download the binary and make it executable:

<code>
wget -P /usr/local/bin https://github.com/M0LTE/QtTermTCP-builds/releases/download/release/QtTermTCP
chmod +x /usr/local/bin/QtTermTCP
Then create a .desktop file so you can find QtTermTCP in your applications menu.
nano /home/$USERNAME/.local/share/applications/QtTermTCP.desktop
Enter the following:
#!/usr/bin/env xdg-open
[Desktop Entry]
Version=1.0
Type=Application
Terminal=false
Exec=/usr/local/bin/QtTermTCP
Name=QTTermTCP
Comment=QTTermTCP
Then press Ctrl + O to save and Ctrl + X to exit nano.
You should now be able to launch QtTermTCP from the “Applications” menu
Raspbian Desktop - standard installation
In almost every case, you are better off installing by following this guide than building it yourself: https://guide.hibbian.org/clients/qtttcp/
Raspbian Desktop - manual installation
NOTE: the following instructions work exactly the same for Ubuntu 22.04
QtTermTCP can be compiled for a Raspberry Pi. From a fresh install run the following commands:
# First let's install the support packages.
sudo apt-get install -y qt5-qmake qtbase5-dev libqt5serialport5-dev qtmultimedia5-dev git

# Move to the user's home folder and create a source folder.
# If it already exists, it's ok.
cd
mkdir -p src
cd src

# Download the source code.
git clone git://vps1.g8bpq.net/QtTermTCP
cd QtTermTCP

# We want to do a shadow build so it's easy to update later
mkdir build
cd build
qmake ..

# NOTE: older Pi's like 2's and 3's will want to use a "-j2" or "-j3"
# but Pi 4/400's can support the "-j4" just fine.
make -j4

# Now the executable will reside in the build folder so let's
# make a tidy home for it as a folder in our home folder.
mkdir -p ~/QtTermTCP
cp QtTermTCP ~/QtTermTCP
cd ~/QtTermTCP

# Ensure the program is executable.
chmod +x QtTermTCP

# Now make a simple script to use for a desktop shortcut or manually starting the program.
touch QtTermTCP.sh
echo "#!/bin/bash" > QtTermTCP.sh
echo "cd ~/QtTermTCP" >> QtTermTCP.sh
echo "./QtTermTCP > /dev/null & 2>&1" >> QtTermTCP.sh
echo "exit 0" >> QtTermTCP.sh
chmod +x QtTermTCP.sh
The program may be run using the shell script found at /home/<user>/QtTermTCP/QtTermTCP.sh
This shell script may also be used to build a shortcut for the desktop. For RPi, open the File Manager and find the QtTermTCP.sh file. Drag the file to the desktop and drop it. For other Linuxes, the desktop shortcut creation may be different.
Setup
Setup should be similar for both Windows and Linux versions. Note of the 3 connection methods documented below, you'd generally only configure one - so pick the method most relevant to your setup.
KISS via Serial
KISS (Keep It Simple, Stupid) is a protocol for communicating with a serial terminal node controller (TNC) device used for amateur radio. An example of a modern TNC is the NinoTNC.
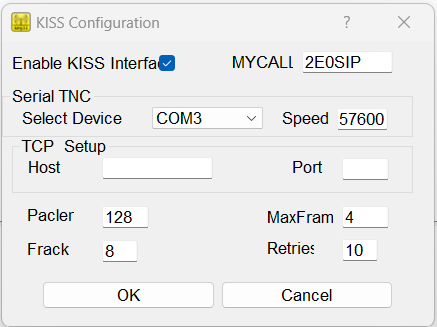
Open QTTermTCP, click Setup > KISS Setup.
Tick Enable Enable KISS interface, enter your callsign.
In the Serial Setup section select the COM port of the attached TNC, and enter the desired baud rate (Note: This is the baud rate of the serial device itself, not the baud rate you wish to transmit at). The Baud Rate for the NinoTNC is 57600.
KISS via TCP
KISS Over TCP is useful if you're running QtTermTCP and want to connect to Dire Wolf, which is either running locally, or perhaps running on a Raspberry Pi and you want to connect from QtTermTCP running on your daily driver PC.
Open QTTermTCP, click Setup > KISS Setup.
Tick Enable Enable KISS interface, enter your callsign.
In the Serial Setup section select “TCP” in the drop down for Serial Device.
In the TCP Setup section enter the IP and port of the KISS modem. If you're running Dire Wolf on your local machine the IP would be 127.0.0.1. Dire Wolf listens on port 8001 for KISS by default.
It should look something like:
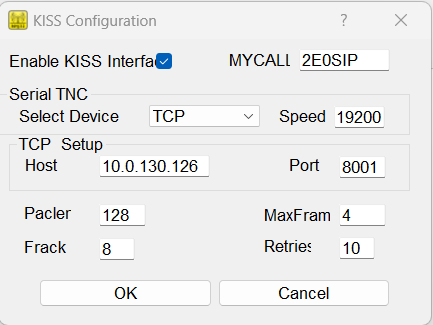
Press OK when finished to exit the setup.
AGW
AGW is a packet protocol used by in SV2AGW's collection of packet software. It can be used to connect to software modems like QtSoundModem.
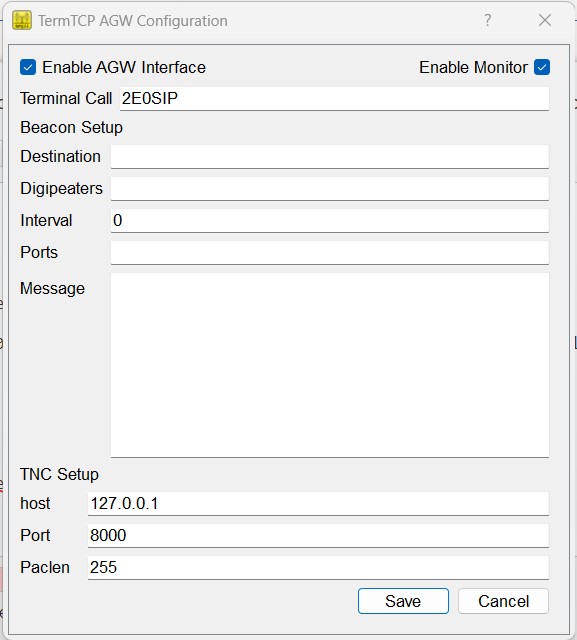
To configure it, open QTTermTCP, click Setup > AGW Setup.
Enter your callsign, ignore the Beacon setup for now, and then in the TNC Setup section configure the Host, Port, and Paclen. If you're using QtSoundModem on the same machine, the host is 127.0.0.1 and the default port is 8000.
Usage
Once you've configured QTTermTCP you can try to connect to something.
KISS
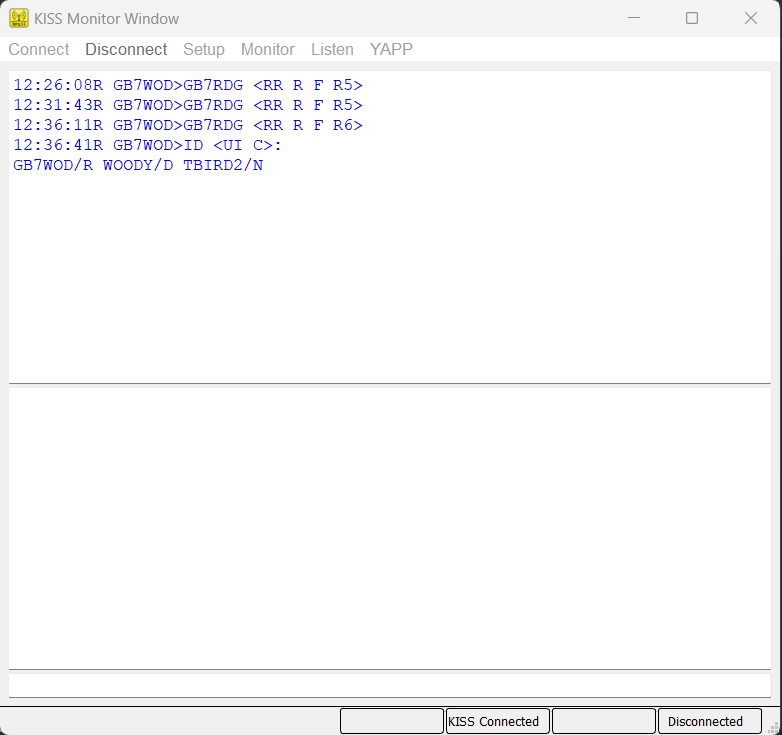
Open QTTermTCP. Assuming everything is setup correctly you should see “Kiss Connected” in the bottom status bar.
By default, the windows is split into three. The top panel is monitoring any packets sent or received. If you're in range of another packet station you should see some activity here. The Middle panel is there terminal and will show any data sent from a node once connected. The bottom small text bar is for sending text to a connected node.
Monitor panel showing some activity from GB7WOD:
To attempt to Connect, in the top bar select Connect > KISS Connect and enter the call sign of the station you wish to connect to. Digis can usually be left empty if you're in direct range of the node you're connecting to.
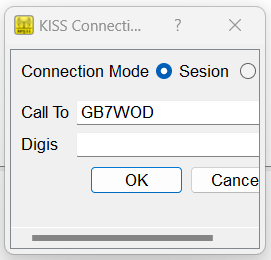
Press OK once finished to connect
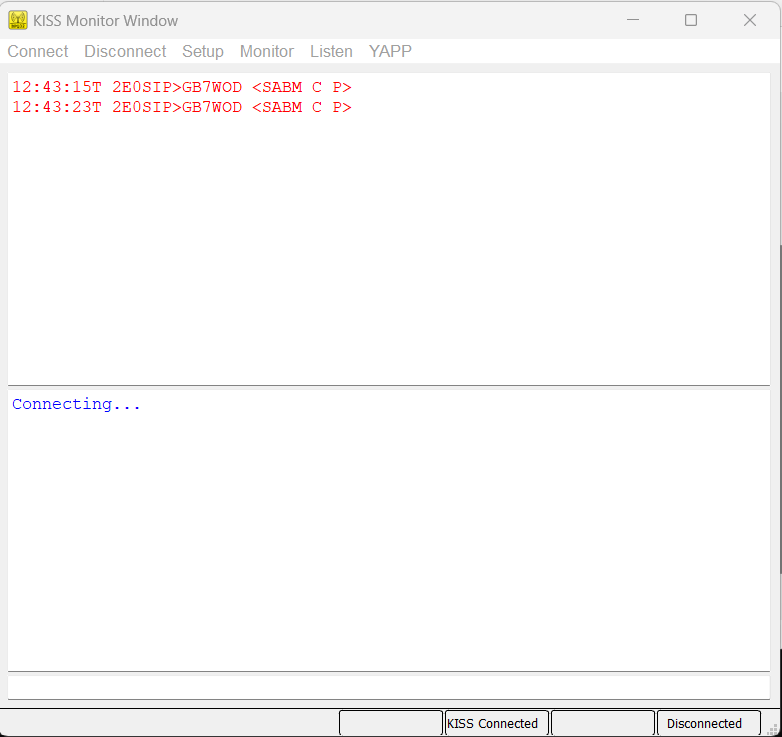
You should then attempt to connect to the node. You can see the sent packets in the monitor window.
Once connected, you can start to interact with the node.
AGW
Open QTTermTCP. Assuming everything is setup correctly you should see “AGW Connected” in the bottom status bar.
To attempt to Connect, in the top bar select Connect > AGW Connect and enter the call sign of the station you wish to connect to. Digis can usually be left empty if you're in direct range of the node you're connecting to. You'll also have to select the radio port. For a single modem connection this will be the first in the list.
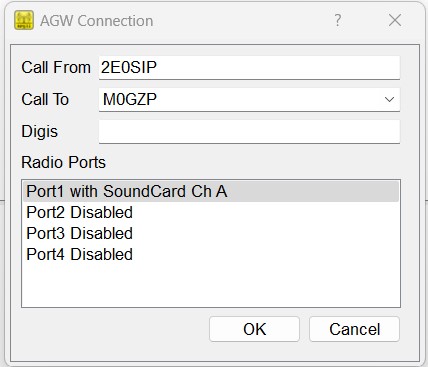
Press OK once finished to connect. You should then attempt to connect to the node. You can see the sent packets in the monitor window.
Once connected, you can start to interact with the node.
LISTEN
QtTermTCP has a very nice feature that ties directly with the TALK command.
When set up correctly if a remote user types “TALK” and your node handles it a tab will open on your QtTermTCP app and you can communicate directly with that user.
For this configuration example (it is actually mine), I have the TNC connected to one machine running linBPQ and my main machine running QtTermTCP.
I need to know my main machine's IP address (not the internet IP address, my internal network IP address).
192.168.1.175
I also need a port number on my main machine to listen on. I will use
8015
In QtTermTCP, click on the Listen menu. A new window will open as below:

Check the box [X] Enable Listen
Fill in the port number (8015 in my example)
Fill in the CText box with the information the end user will see when they use the “TALK” command
Click the OK button.
If you notice a mistake later you can Click on the “Listen” menu item again to change it.
On the node itself you need to add the TALK command to bpq32.cfg. Below I show mine.
APPLICATION 4,TALK,att 2 192.168.1.175 8015,GB7ODZ-5,ODZTLK, ; TALK Application
Step by step:
APPLICATION 4
This is the application number, you can have between 1 and 32. Ensure the number is unique (you can't have 2 application 4 lines).
TALK
This is the command the end user types to activate the command
att 2 192.168.1.175 8015
Attach to port 8015 on IP address 192.168.1.175 using BPQ port 2 (this is my node's telnet port, PORTNUM 2).
GB7ODZ-5
This is a direct connection to the TALK command. The end user could type C GB7ODZ-5 and it would be as if they connected to my node as normal and then typed the “TALK” command
ODZTLK
This is the alias of GB7ODZ-5 and can be used in the same manner (C ODZTLK)
Save the config file and restart bpq32.
One thing I do in QtTermTCP is to enable tabbed windows which means I can have multiple connections in one app.
Click on the Setup menu and then Tabbed.
Also, tick [X] Beep on inbound connections. This will make a noise when the end user connects to TALK.
When the end user connects to TALK, a tab at the bottom will show the remote user's callsign.
If you change the “Tabbed” option then restart QtTermTCP.

Building from source
This is not necessary for most use cases, just for reference.
On Windows
As of 0.0.0.79 commit a5e1b1389cbd9b3718b9ae41277f90633154cf47 from git://vps1.g8bpq.net/QtTermTCP
With VS2022 on Windows 11
Requires:
- C++ desktop development workload installed in VS Installer
- Windows SDK 10.0.17763.0 (VS will tell you if the version needed is now different)
- Qt Visual Studio Tools extension (Extension Manager)
- Qt 5.14.2 (check version in QtInstall element in QtTermTCP.vcxproj) - you just need the msvc2017 bits
Notes:
- Remove the hard coded path from the .sln file
- In the Qt VS Tools extension, add a Qt installation named “5.14.2” pointed at C:\Qt\Qt5.14.2\5.14.2\msvc2017\bin - this is referenced from the project file
- Run C:\Qt\Qt5.14.2\5.14.2\msvc2017\bin>windeployqt.exe C:\git\vps1.g8bpq.net\QtTermTCP\Win32\Debug
On Debian-ish Linux (including WSL)
Tested on Ubuntu 24.04
sudo apt install -y qt5-qmake qtbase5-dev libqt5serialport5-dev qtmultimedia5-dev
mkdir build && cd build
qmake ..
make -j4